1. 첨부의 *.pdf 의 설명이 아래것보다 더 자세함.

2. 우측의 Go to the article at CodeProject 이 원본인듯.


출처 : http://www.intellesoft.net/bugtrap1.shtml

BugTrap for Win32/64 & .NET (part 1)

Go to part 2 Go to the article at CodeProject

Our business is based on IT consulting and it's vital for us to provide our clients with stable products. In real life every more or less complex system includes effective code as well as developer mistakes (bugs). Though in theory it's acceptable when a program is stable enough to satisfy most user needs, there is no user who likes general protection faults, access violations and other kinds of unexpected errors.

IntelleSoft is concerned about all bugs - big and small, serious and trivial. Our software is developed using numerous error preventive approaches, including safe programming, redundant data validation, self-recovery in critical code parts, etc.

Moreover, we are interested in tracking and fixing those errors that still have not been handled and might violate normal program execution. If you expect an error, you would rewrite the code to avoid a potential problem. But what would you do with unexpected errors? You just finished debugging your application, and it seems to be working as expected. You might think that your code is perfect (well, almost perfect) but user downloads your program and somehow it stops working. Usually it's especially difficult to find the reason of such errors because they are unpredictable by their nature. It's impossible to predict the sort of the problem and the piece of code that causes the problem. A lot of errors may occasionally happen on remote customer machine and at best developers may receive a screenshot of system error message. Indeed user cannot tell the developer what's wrong in program code!

Right in this case BugTrap comes to the play. Rather than making assumptions about possible errors or modifying program source code, BugTrap automatically substitutes system error handler and monitors any exceptions not handled in the program. As soon as any error takes place, BugTrap catches it and prompts a user to send bug report to the developer:

Simplified BugTrap interface

So what errors can BugTrap handle? - In short, it can handle all types of errors!

1. All sorts of access violations and general protection faults:


  typedef int (*TFunc)(const char* pszParam);
  TFunc pFunc = (TFunc)GetProcAddress(hDll, "NoSuchFunction");
  (*pFunc)("This is one of possible developer mistakes"); // Access violation

2. Unlike most other tools, BugTrap intercepts unhandled C++ exceptions and unwinds stack trace to the throw statement. BugTrap natively recognizes MFC, ATL and STL exceptions.


  std::vector<int> arr(10);
  for (size_t i = 0; i <= arr.size(); ++i)
    arr.at(i) = 0; // Array subscript is out of range

Error report may be automatically delivered to product support by e-mail, HTTP or light-weight TCP-based network protocol:

Reports delivery

Advanced users and programmers may immediately preview report, save it to the file, or use enhanced graphical interface to examine the problem:

Advanced BugTrap interface

On the next page you may see how error report can be used to find and fix the problem.


Go to part 2 Go to the article at CodeProject

Downloads
Documentation
Setup
Source Code


BugTrap for Win32/64 & .NET (part 2)

Go to part 1 Go to the article at CodeProject

Error report includes huge amount of useful information including error reason, error location in program source code and comprehensive description of user computer environment which is vital for repeating the problem on developer's side. A developer can customize the amount of extracted information, hide or show program code and even add custom log files with arbitrary contents.

BugTrap supports three completely independent approaches for detecting error location in the source code:

  • Minidump files
  • Automatic PDB file analysis
  • Automatic MAP file analysis

Every approach has its own advantages and specific, therefore BugTrap natively combines them together.

1. Minidump files can be opened directly in Visual Studio .NET and an error can be seen "on the fly". It looks just like normal debugging of interrupted program:

Minidump file in Visual Studio .NET

2. PDB files are ideal for product testers and SQA groups because you don't have to debug the problem. Error details are available for quick review in BugTrap dialog:

Error details in BugTrap

Note that the support of PDB files can be disabled in order to hide program source code on customer side.

3. And finally CrashExplorer may restore stack trace on developer computer from raw exception addresses stored in error log and standard application's MAP or PDB file generated by Microsoft Visual Studio C++ compiler:

Crash Explorer

  • Supported platforms: Win32/64 and .NET
  • Supported environments: Visual Studio 6/.NET/2005/2008
  • Supported operating systems: Windows 98/Me/NT 4/2000/XP/Vista


'Programming' 카테고리의 다른 글

[펌] (링크 2): Win7의 Timer Resolution : 15msec  (1) 2011.12.13
[펌] BugTrap 설정시 문제점들...  (0) 2011.11.30
[펌] BugTrap  (0) 2011.11.30
Posted by 세모아
,
출처: http://smstock.tistory.com/entry/BugTrap-%EC%84%A4%EC%A0%95%EC%8B%9C-%EB%AC%B8%EC%A0%9C%EC%A0%90%EB%93%A4

클라이언트에 버그트랩설치시에는 별로 어렵지 않다 나오는데로 하기만 하면된다

ANSI mutibyte 일 경우는 BugTrap.lib를 사용하고
UNICODE일 때는 BugTrapU.lib를 사용해야한다는 것 정도만 조심하면 될듯
(똑같이 사용했는데 서버와 연결이 안되면 의심해 봐야할듯)


하지만 문제는 서버를 설치할 때이다.

버그트랩을 설치하면 해당 폴더에 Server라는 폴더가 생기고 그안에 FTP용 서버인 BugTrapServer가 존재한다

가이드를 보면

서비스 등록
BugTrapServer.exe /install

서비스 해제
BugTrapServer.exe /uninstall


이라고 나와있다.

하지만 서비스 등록을 하려고 위와 같이 실행해보면


System.ArgumentNullException : 값은 null일 수 없습니다


라는 글이 나오는 것을 확인 할 수 있다.

해결법은 간단하다
C:\WINDOWS\Microsoft.NET\Framework\v2.0.50727 폴더에 존재하는 InstallUtil.exe로 서비스에 등록하면 된다

InstallUitl.exe (절대경로)\BugTrapServer.exe

위와 같이 실행하면 된다

'Programming' 카테고리의 다른 글

[펌] BugTrap 상세 설명  (2) 2011.11.30
[펌] BugTrap  (0) 2011.11.30
[펌] OOP 매직- private 멤버 억세스하기~  (0) 2011.11.03
Posted by 세모아
,

[펌] BugTrap

Programming 2011. 11. 30. 19:21
출처: http://loveru0.egloos.com/1351931

BugTrap 프로그램일반

이번 2차 클베의 숨어있는 공신..
BugTrap을 소개한다.

BugTrap은 프로그램이 크래쉬났을때 크래쉬정보를 분석하고,
분석된 정보를 메일서버 또는 TCP서버로 전송해주는 역할을 한다.
사용법이 매우 간단하며, 오픈소스라 적당히 커스터마이징 하기에도 무리가 없다.

일단 기본적인 BugTrap사용법에 대해 알아보고,
카르카스 온라인에서는 사용한 통계툴에 대해 소개한다.
참고로 카르카스 온라인에서는 메일서버가 아닌 TCP서버를 사용한다.

## 프로그램구동시 lib파일을 적재한다.

#pragma comment(lib, "BugTrap.lib")

## 진입점에서 초기화한다.
void SetupBugTrap()
{
        BT_InstallSehFilter();

        // 애플리케이션의 버전을 남긴다.
        // TCP서버로 전송할 경우 버전에 따라 크래쉬정보를 모아주므로 상당히 유용한 기능이다.
        BT_SetAppVersion( cTime.Format(L"%Y-%m-%d").GetString() );

        // 애플리케이션 이름을 설정한다.
        BT_SetAppName(_T("Karcass Client"));

        // 메일서버로 전송할 경우 전송할 메일주소이다. ( 카르카스온라인에선 사용하지 않는다. )
        BT_SetSupportEMail(_T("loveru0@jcrsoft.co.kr"));

        // BugTrap의 속성을 정의한다.
        BT_SetFlags( dwFlag );

        // 대표적인 속성들은 다음과 같다.
        // BTF_DETAILEDMODE : 미니덤프나 로그파일등을 압축해서 모두 전송해준다. 
                                              정의하지 않을 경우 기본적인 정보만 전송해준다.
        // BTF_SCREENCAPTURE : 스크린샷을 첨부한다.

        // 미니덤프에 참조변수까지 남긴다.
        BT_SetDumpType( MiniDumpWithDataSegs | MiniDumpWithIndirectlyReferencedMemory );

        // 전송할 TCP서버를 세팅한다.
        BT_SetSupportServer(_T("000.00.000.000"), 9999);

        // Log생성
        g_jBT_LogSound = BT_OpenLogFile( L"SoundLog.txt", BTLF_TEXT );
        BT_SetLogSizeInEntries( g_jBT_LogSound, 1024 );
        BT_SetLogFlags( g_jBT_LogSound, BTLF_SHOWLOGLEVEL | BTLF_SHOWTIMESTAMP );
        BT_SetLogLevel( g_jBT_LogSound, BTLL_INFO );
        BT_AddLogFile( BT_GetLogFileName( g_jBT_LogSound ) );
}

## 생성한 로그사용
HRESULT JSound::LoadSoundFromMemory( const char* cFileName )
{
        ...

        BT_InsLogEntryF( 
                g_jBT_LogSound, BTLL_INFO, _T("LoadSoundFromMemory : %s"), JUtil::ToWideString(cFileName).c_str() );

        ...
}

TCP서버를 사용하므로 서버머신에 BugTrap서버프로그램을 실행시켜두는 것으로 기본적인 세팅은 끝이다.

다음은 크래쉬가 났을때의 BugTrap의 모습이다.


보시다시피 뭐가뭔지 영어의 압박이 밀려온다.
과연 유저가 저화면을 만났을때 제대로 전송버튼을 눌려줄까?

여기서 오픈소스의 장점이 나타난다.
다음과 같이 알아보기 쉽게 변형해서 사용하자.


이제 통계툴을 소개한다.
위에서 메일서버가 아닌 TCP서버를 사용한 이유가 여기서 나타난다.
메일서버는 속도가 느리며, 저장방식이 툴만들기에 적합하지 않기 때문이다.

앞서얘기했듯이 TCP서버로 전송되어져온 크래쉬 정보는 Version별로 생성된 폴더에 저장된다.
Version으로 클라이언트가 실행될때의 날짜를 세팅하고 있으므로 날짜별로 같은폴더에 모이는 효과를 가진다.

툴은 특정폴더내의 크래쉬정보들을 대상으로 통계작업을 수행하면 된다.


개별적인 크래쉬정보는 ZIP파일로 압축되어 있으며
압축파일내의 크래쉬정보파일, 미니덤프파일, 로그파일등을 적절히 이용하면 된다.

카르카스온라인에서 사용하고 있는 분석툴이다.
보안상 부분적으로만 공개한다.

폴더를 열면 폴더내의 크래쉬정보들을
파일명과 함수명을 기준으로 통계작업을 수행한다.


종류별로 모아진 데이터를 기반으로 개별적인 정보들을 보여준다.


서비스를 하다보면 수많은 크래쉬에 프로그래머들은 지쳐간다.
BugTrap같은 잘만들어진 라이브러리를 위와같은 툴로서 활용하면 보다
빠르고 편하게 크래쉬에 대처할 수 있고, 화기애애한 개발분위기가 조성되지 않을까.


Posted by 세모아
,
Tip'N Tricks 게시판의 이석민님의 웹브라우저 컨트롤의 Parent 프로퍼티의 사용에 대한 글을 삭제하였습니다. 오해는 말아주시기 바랍니다. 잘못된 내용이라거나 해서 삭제한 것이 아니라, 정보의 초점이 잘못되었기 때문입니다.

기술적으로는, 특정 클래스의 참조할 수 없는 멤버를 참조하기 위해 그 클래스를 베이스클래스로 강제로 캐스팅(혹은 반대로 서브클래싱)해서 멤버를 참조하는 것을 OOP 매직이라고 합니다. 이 특성은 이용함에 따라 여러가지로 응용이 가능한데, 하이텔 비주얼파워툴의 델마당에서도 스트링그리드의 행 삽입/삭제에 동일한 방법을 사용한 예제를 본 기억도 납니다. 약간은 다르지만 비슷한 원리를 이용하는 예로서는 역시 Tip'N Tricks 게시판의 21번 글에서도 언급한 적이 있습니다.

출처: http://cbuilder.borlandforum.com/impboard/impboard.dll?action=read&db=bcb_tip&no=21

2741 읽음    1999-06-04 00:00 임프랍니다..
오늘은 어제저녁부터 계속된 네트웍 문제 때문에 오늘의 팁이 좀 늦었네요..
기다리신 분들께 정말 죄송하구요..
늦은 만큼.. 사죄의 의미로 오늘은 정말! 다른 곳에는 절대로 없는!
빌더라운지에서 최초로 공개하는! 저만의 팁을 하나 알려드리죠..
(기대하시라 기대하시라~~~ --;;;;;)

oop에서 클래스의 인캡슐레이션(캡슐화라고 하지 맙시다.. 웬 콩글리시..)은
아주 중요한 역할을 하죠. 객체의 상속단계에서 객체 외부에서 사용되어서는
안될 멤버들은 private 멤버로 정의하곤 하는데.. 이러한 정보의 은닉이
때로 약간이라도 잘못 설계되어 private 멤버를 억세스해야할 필요가 있을때는
정말 황당해지죠. 더욱이 실무자에게 있어, 꼭 필요한 멤버함수개?멤버변수가
있긴 한데 그게 private라면.. 억~ 입니다.

이런 경우에.. 보통은 해당 클래스를 다시 상속받으면서 퍼블릭으로 재정의하고는
하는데.. 그러면 원하는 멤버를 억세스할 수 있게되죠. 
하지만.. 다시 상속받은 클래스는, 베이스클래스가 컴퍼넌트였을 경우(컴퍼넌트
팔레트에 나오는), 컴퍼넌트 레지스터 루틴까지 만들어주지 않으면 디자인타임에
써먹을 수가 없죠. 오직 런타임 온리... 쩝.. 황당해지잖아요. 엄청 불편합니다.

추상화.. 인캡슐레이션.. 정보은닉.. 이딴거.. 이론적으론 참 좋죠.. oop라..
하지만.. 분초를 다투는 실무 프로그래머에게 이딴게 뭔 소용입니까..
오히려 시간만 더 잡아먹죠..

그래서... private 멤버를 억세스하는 방법을 공소스가 없는, 혹은 소스를 재컴파일하기 싫은 클래스가 있는 모듈
(내맘대로이름.lib, .obj, 혹은 .bpl등)과 그 헤더화일
내맘대로이름.h(혹은 hpp)가 있을때, 그 클래스의 멤버가
퍼블릭인지 프리이빗인지 프로텍티드인지 오토메이티드인지 퍼블리시드인지는
오직! 헤더화일(내맘대로이름.h)에만 의존합니다. 컴파일된 모듈 obj, lib, bpl
등에는 이러한 정보가 일체 남지 않습니다.

눈치빠르신 분은 벌써 감을 잡으셨을겁니다. 맞습니다.
프라이빗이나 프로텍티드를 퍼블릭이나 퍼블리시드 멤버로 바꾸려면?
헤더화일만 고쳐주면 됩니다. 헤더화일에서 퍼블릭이나 퍼블리시드로 만들고 싶은
멤버를 public: 이나 __published: 섹션으로 옮겨버리면 만사 오케이입니다.
다른 모듈에서 호출할때 헤더화일만을 참조하기 때문에, 원래 프라이빗 멤버였더라도
퍼블릭으로 간주됩니다. 아니, 실제로는 완전히 퍼블릭 멤버가 되어버린거죠.

이 방법을 써서.. 장난을 쳐봅시다.
원래 vcl의 TCustomGrid에는 유용한 메소드들이 많은데, 대부분이 외부에서 사용할
수 없도록 protected로 선언되어있습니다. 열받지요?
대표적으로, TDBGrid에서는 DeleteRow()가 있음에도 불구하고 억세스할 수 없습니다.
왜? 단지 베이스클래스인 TCustomGrid에서 이 함수가 protected로 선언되어 있기
때문이죠. 열받죠?
(안된다는게 안믿기는 분은 직접 해보세요. "어쩌구 저쩌구 not accessible"
라는 메시지만 보게 될겁니다.)

그럼 헤더를 수정합시다.
빌더의 include/vcl 디렉토리에 있는 grids.hpp화일을 열어서, TCustomGrid클래스의 선언부분으로 갑시다. protected: 섹션의 엄청 많은 함수들 중에서
DeleteRow()와 DeleteCol()의 선언을 발견하실 수 있을겁니다.
이 선언부를 그 아래에 있는 public: 섹션으로 살~짝~ 옮겨봅시다.
물론 다음에 원래대로 돌리기 위해 원래의 헤더화일(grids.hpp)는
다른 이름으로 백업을 해놔야겠죠?
그리고 TCustomGrid를 상속받는 클래스들(많지요? 디비그리드, 스트링그리드 등등)
에서 DeleteGrid()를 호출해봅시다. 잘 되죠?

이 팁의 활용도는 엄청납니다. 한두가지 일을 더 할수 있는 정도가 아닙니다.
물론 잘못 사용하면 엄청난 황당한 일을 당할수도 있겠지만, 잘만 사용하면
기존의 프로그래밍에서 할 수 없었던 엄청난 일들을 할 수 있죠.

oop 개념을 깨는 거니까 많이 쓰면 안좋을거라구요? 물론이죠.
하지만.. 당장 분초를 다투는 실무 프로그래머한테 그렇게 말하면서
"방법을 알긴 아는데 oop를 깨는 거기 때문에 알려줄수 없다" 고 해보세요.
내일 아침 조간신문에 비명횡사한 변사체로 실릴겁니다. (^^;;;;;)

어떤 독약이라도 잘만 쓰면 명약이라고 하지요? 이 경우도 마찬가지입니다.
적당한 수준에서 자제해서 써먹어야 할겁니다.


독립문에서 임펠리테리였습니다.
개합니다..
이 방법은 델파이에서는 절대 안되고, 온리~! 빌더에서만 가능하죠..
(델파이에서 안되는 이유는 아래 설명을 보시면 아시게 될겁니다.)
정확히 말하면.. 정보의 은닉 개념이 깨어지는 것이기 때문에, C++ 언어상의
버그라고 볼수 있지만.. 실무자에겐 감지덕지죠~ ^^

방법은.. 무지 간단합니다.

'Programming' 카테고리의 다른 글

[펌] BugTrap  (0) 2011.11.30
[펌] Copy Directory in .Net C# including sub-folders  (0) 2011.10.08
[펌] 핸들 릭 찾기(핸들 누수 찾기)  (0) 2011.10.04
Posted by 세모아
,
from: http://blog.logiclabz.com/c/copy-directory-in-net-c-including-sub-folders.aspx

  1. System.IO  


  1. private static bool CopyDirectory(string SourcePath, string DestinationPath, bool overwriteexisting)  
  2.        {  
  3.            bool ret = false;  
  4.            try  
  5.            {  
  6.                SourcePath = SourcePath.EndsWith(@"\") ? SourcePath : SourcePath + @"\";  
  7.                DestinationPath = DestinationPath.EndsWith(@"\") ? DestinationPath : DestinationPath + @"\";  
  8.   
  9.                if (Directory.Exists(SourcePath))  
  10.                {  
  11.                    if (Directory.Exists(DestinationPath) == false)  
  12.                        Directory.CreateDirectory(DestinationPath);  
  13.   
  14.                    foreach (string fls in Directory.GetFiles(SourcePath))  
  15.                    {  
  16.                        FileInfo flinfo = new FileInfo(fls);  
  17.                        flinfo.CopyTo(DestinationPath + flinfo.Name, overwriteexisting);  
  18.                    }  
  19.                    foreach (string drs in Directory.GetDirectories(SourcePath))  
  20.                    {  
  21.                        DirectoryInfo drinfo = new DirectoryInfo(drs);  
  22.                        if (CopyDirectory(drs, DestinationPath + drinfo.Name, overwriteexisting) == false)  
  23.                            ret = false;  
  24.                    }  
  25.                }  
  26.                ret = true;  
  27.            }  
  28.            catch (Exception ex)  
  29.            {  
  30.                ret = false;  
  31.            }  
  32.            return ret;  
  33.        } 


Using this function

  1. bool copy = CopyDirectory("c:\\temp\\index\\", "c:\\temp\\newindex\\", true); 

Posted by 세모아
,
from: http://learder.tistory.com/827077

비슷한 게시물 3 개를 묶어 보았다

1. http://kukuta.tistory.com/115


2. http://www.taegony.net/28


3. http://blog.daum.net/pdpdds/15700730

=================================
핸들이란?

예를 들면 file 을 열때, 네트웍 소켓 열때 씁니다.

메모리와는 다르게. 외부의 I/O인터페이스를 만들어 쓰면 핸들이 필요합니다.
이때 핸들이란 자동차 핸들처럼 외부 I/O를 조정하는 장치 비슷한 의미입니다.

fopen 으로 화일 열면 핸들 수 증가하게 됩니다.


Posted by 세모아
,
출처 : http://blogit.blogkorea.net/46848829/http://allofsoftware.net/entry/WhyTheyFailonSoftware

소프트웨어 릴리즈는 그 성격에 따라서 몇 가지 형태로 구분이 됩니다.

소프트웨어는 그 종류가 셀 수 없이 많아서 획일적으로 얘기할 수는 없어도, 릴리즈를 구분하여 부르는 것은 필요합니다. 릴리즈를 구분하다는 것은 현재 릴리즈가 어떠한 것이고, 그에 따라서 어떠한 프로세스를 따라야 하고, 어떠한 기대값을 가져야 하는지 그 이름만 들어도 알 수 있게 합니다.

하지만, 팩키지를 개발하는 소프트웨어 회사는 나름대로 릴리즈 구분에 익숙해져 있지만, SI회사, 게임회사, 포탈 등의 서비스 회사, 금융회사들은 릴리즈는 그냥 릴리즈라는 생각을 하고 합니다. 따라서 수많은 릴리즈를 함에도 불구하고 각 릴리즈를 부르는 버전도 없는 경우가 허다하고, 개발자가 임의대로 릴리즈를 하는 경우도 많습니다.

그럼 릴리즈를 어떻게 구분하여 부르면 의사 소통에 도움이 될지 알아보죠.

업그레이드 릴리즈 (Upgrade release)
계획된 일정에 따라서 제품의 주요한 기능이 바뀌어서 릴리즈 되는 것을 일컫습니다. 그 규모와 성격에 따라서 메이져 또는 마이너 업그레이드라고 하고 정상적인 개발 프로세스를 거치며 테스트로 전 기능에 걸쳐서 철저하게 이루어 지는 것이 보통입니다.
 
패치 릴리즈 (Patch release)
특정 기능에서 발생한 버그나 작은 기능을 개선한 것들을 모아서 릴리즈 하는 것을 말합니다. 보통 계획적으로 일정을 잡거나 업그레이드 릴리즈 후 고객들의 반응을 보고 패리 릴리즈 일정을 잡기도 합니다. 보통 유지보수 개발자들이 개발을 담당하고 테스트로 업그레이드 릴리즈 때보다는 간소화 하기도 합니다.

핫픽스 (Hotfix)
심각한 버그가 발견되어서 긴급하게 특정 고객을 대상으로 또는 전체 고객에게 버그를 수정한 버전을 전달하는 것을 말합니다. 이 경우 사안이 긴급하여 개발 및 테스트 프로세스가 상당부분 생략되며, 이로 이한 위험부담을 어느 정도 감수하는 릴리즈를 말합니다.

또 제품의 완성도에 따라서 알파, 베타, RC 릴리즈로 나뉠 수 있습니다.

알파 릴리즈는 제품의 기능은 구현이 다 되었으나 버그는 좀 있을 수 있습니다. 하지만, 제품을 더이상 써 볼 수 있는 정도의 심각한 버그는 없어야 합니다.

베타 릴리즈는 제품의 심각한 버그는 거의 없어서 기능을 거의다 정상적으로 사용할 수 있는 상태를 말합니다.

RC 릴리즈는 제품을 출시할 수 있는 정도로 사소한 버그가 몇개만 포함된 버전을 말합니다.

이렇게 릴리즈를 나누는 이유는 각 릴리즈에 따라서 들어가는 비용과 개발 프로세스가 다르고, 리스크가 다르기 때문입니다. 이러한 구분이 없이 그냥 개발자가 소프트웨어를 수정하는 대로 릴리즈를 하고 있다면, 테스트 등 릴리즈에 들어가는 비용을 들이지 않는 주먹구구식 개발일 가능성이 높습니다. 하지만 이러한 마구잡이식 릴리즈가 결국 더 많인 비용을 이미 지불하고 있다는 것을 알아야 합니다.

'Programming' 카테고리의 다른 글

[펌] 핸들 릭 찾기(핸들 누수 찾기)  (0) 2011.10.04
[펌] What is a Manifest (in Windows)?  (1) 2011.04.26
Manifests (from MSDN)  (0) 2011.04.26
Posted by 세모아
,
from: http://www.daniweb.com/web-development/databases/mysql/threads/165434

The default Storage engine is

Go for mysql prompt.

mysql> show databases;
+--------------------+
| Database |
+--------------------+
| information_schema |
| images |
| mysql |
| test |
+--------------------+
4 rows in set (0.00 sec)

mysql> use information_schema;
Reading table information for completion of table and column names
You can turn off this feature to get a quicker startup with -A

Database changed
mysql> show tables;
+---------------------------------------+
| Tables_in_information_schema |
+---------------------------------------+
| CHARACTER_SETS |
| COLLATIONS |
| COLLATION_CHARACTER_SET_APPLICABILITY |
| COLUMNS |
| COLUMN_PRIVILEGES |
| ENGINES |
| EVENTS |
| FILES |
| GLOBAL_STATUS |
| GLOBAL_VARIABLES |
| KEY_COLUMN_USAGE |
| PARTITIONS |
| PLUGINS |
| PROCESSLIST |
| PROFILING |
| REFERENTIAL_CONSTRAINTS |
| ROUTINES |
| SCHEMATA |
| SCHEMA_PRIVILEGES |
| SESSION_STATUS |
| SESSION_VARIABLES |
| STATISTICS |
| TABLES |
| TABLE_CONSTRAINTS |
| TABLE_PRIVILEGES |
| TRIGGERS |
| USER_PRIVILEGES |
| VIEWS |
+---------------------------------------+
28 rows in set (0.00 sec)

mysql> select * from ENGINES;
+------------+---------+----------------------------------------------------------------+--------------+------+------------+
| ENGINE | SUPPORT | COMMENT | TRANSACTIONS | XA | SAVEPOINTS |
+------------+---------+----------------------------------------------------------------+--------------+------+------------+
| InnoDB | YES | Supports transactions, row-level locking, and foreign keys | YES | YES | YES |
| MRG_MYISAM | YES | Collection of identical MyISAM tables | NO | NO | NO |
| BLACKHOLE | YES | /dev/null storage engine (anything you write to it disappears) | NO | NO | NO |
| CSV | YES | CSV storage engine | NO | NO | NO |
| MEMORY | YES | Hash based, stored in memory, useful for temporary tables | NO | NO | NO |
| FEDERATED | NO | Federated MySQL storage engine | NULL | NULL | NULL |
| ARCHIVE | YES | Archive storage engine | NO | NO | NO |
| MyISAM | DEFAULT | Default engine as of MySQL 3.23 with great performance | NO | NO | NO |
+------------+---------+----------------------------------------------------------------+--------------+------+------------+
8 rows in set (0.00 sec)

mysql>

this is how we can search.

=========================================
My) Dell Server에서 실제 결과.
Microsoft Windows [Version 6.1.7600]
Copyright (c) 2009 Microsoft Corporation.  All rights reserved.

C:\Users\Administrator>mysql -uroot -p1234
Welcome to the MySQL monitor.  Commands end with ; or \g.
Your MySQL connection id is 1
Server version: 5.5.8 MySQL Community Server (GPL)

Copyright (c) 2000, 2010, Oracle and/or its affiliates. All rights reserved.

Oracle is a registered trademark of Oracle Corporation and/or its
affiliates. Other names may be trademarks of their respective
owners.

Type 'help;' or '\h' for help. Type '\c' to clear the current input statement.

mysql> show databases;
+--------------------+
| Database           |
+--------------------+
| information_schema |
| eil                |
| mysql              |
| performance_schema |
| test               |
+--------------------+
5 rows in set (0.03 sec)

mysql> use information_schema;
Database changed
mysql> show tables;
+---------------------------------------+
| Tables_in_information_schema          |
+---------------------------------------+
| CHARACTER_SETS                        |
| COLLATIONS                            |
| COLLATION_CHARACTER_SET_APPLICABILITY |
| COLUMNS                               |
| COLUMN_PRIVILEGES                     |
| ENGINES                               |
| EVENTS                                |
| FILES                                 |
| GLOBAL_STATUS                         |
| GLOBAL_VARIABLES                      |
| KEY_COLUMN_USAGE                      |
| PARAMETERS                            |
| PARTITIONS                            |
| PLUGINS                               |
| PROCESSLIST                           |
| PROFILING                             |
| REFERENTIAL_CONSTRAINTS               |
| ROUTINES                              |
| SCHEMATA                              |
| SCHEMA_PRIVILEGES                     |
| SESSION_STATUS                        |
| SESSION_VARIABLES                     |
| STATISTICS                            |
| TABLES                                |
| TABLESPACES                           |
| TABLE_CONSTRAINTS                     |
| TABLE_PRIVILEGES                      |
| TRIGGERS                              |
| USER_PRIVILEGES                       |
| VIEWS                                 |
| INNODB_CMP_RESET                      |
| INNODB_TRX                            |
| INNODB_CMPMEM_RESET                   |
| INNODB_LOCK_WAITS                     |
| INNODB_CMPMEM                         |
| INNODB_CMP                            |
| INNODB_LOCKS                          |
+---------------------------------------+
37 rows in set (0.00 sec)

mysql> select * from ENGINES;
+--------------------+---------+------------------------------------------------
----------------+--------------+------+------------+
| ENGINE             | SUPPORT | COMMENT
                | TRANSACTIONS | XA   | SAVEPOINTS |
+--------------------+---------+------------------------------------------------
----------------+--------------+------+------------+
| FEDERATED          | NO      | Federated MySQL storage engine
                | NULL         | NULL | NULL       |
| MRG_MYISAM         | YES     | Collection of identical MyISAM tables
                | NO           | NO   | NO         |
| MyISAM             | YES     | MyISAM storage engine
                | NO           | NO   | NO         |
| BLACKHOLE          | YES     | /dev/null storage engine (anything you write to
 it disappears) | NO           | NO   | NO         |
| CSV                | YES     | CSV storage engine
                | NO           | NO   | NO         |
| MEMORY             | YES     | Hash based, stored in memory, useful for tempor
ary tables      | NO           | NO   | NO         |
| ARCHIVE            | YES     | Archive storage engine
                | NO           | NO   | NO         |
| InnoDB             | DEFAULT | Supports transactions, row-level locking, and f
oreign keys     | YES          | YES  | YES        |
| PERFORMANCE_SCHEMA | YES     | Performance Schema
                | NO           | NO   | NO         |
+--------------------+---------+------------------------------------------------
----------------+--------------+------+------------+
9 rows in set (0.00 sec)

mysql>

'Programming > Database' 카테고리의 다른 글

MySQL의 DB 백업방법 (HeidiSQL 사용)  (0) 2012.03.17
mysql 의 innodb_buffer_pool_size  (0) 2011.06.01
MySQLDUMP 사용법과 옵션들  (0) 2011.06.01
Posted by 세모아
,

내가 사용하는 서버가 두개가 있는데,

하나는 메인 메모리가 512M이고, 또다른 하나는 1G이다.

그런데 둘다 my.cnf에 내가 아는 아래와 같은 옵션 몇개만 설정하고 써 오고 있었는데,..
innodb_file_per_table
innodb_flush_log_at_trx_commit = 1

이상하게 mysql process 의 CPU점유율이 항상 20%~30% 대에서 안내려가는 현상이 생겼다.
crontab에 걸린 데이터 크롤도 있고 많이 쓰긴 하지만..
이렇게 CPU를 차지할 만큼 큰 job은 아니라고 생각이 들었는데.. 찾다보니,

innodb_buffer_pool_size

라는 옵션이 있는데, 권장은 메인메모리의 50~70% 면서(아마도 Mysql 전용 머신의 경우일 듯), 기본 default는 8M 인 옵션이다.
그래서, 이 옵션을 서버 각각 64M, 256M 로 설정했다. (내 머신들은 Mysql 전용이 아니니까.. 별짓 다하는 기계들..)
설정 하고 나니 CPU점유율 상황이 조금 좋아진 듯 하다.
간단한 옵션인데, 모르고 있으니 서버를 엉뚱하게 운영하고 있었다는 생각이 든다.

Posted by 세모아
,
from: http://algorizm.tistory.com/24

MySQLDUMP 명령은 데이터베이스 백업에 사용되는 명령어이다.
자주 쓰다가 안쓰게 되면 까먹는데 필요할때 빨리 찾아보고 작업을 할 수 있도록 정리해보았다.

공식 메뉴얼 URL은 다음과 같다.
http://dev.mysql.com/doc/refman/5.1/en/mysqldump.html

이번 글에서는 기본적인 사용법과 몇가지 주요한 옵션을 정리해보았다.

1. 데이터베이스 백업

- DB 와 테이블을 지정하여 백업
shell> mysqldump [options] db_name [tbl_name] > filename

- 전체 데이터베이스 풀 백업
shell> mysqldump [options] --all-database
--all-database 대신 -A 옵션을 지정해도 된다.

몇가지 옵션들
--disable-keys, -K
MyISAM 테이블에 덤프파일을 통해 INSERT 시 사용하면 덤프파일을 읽어와서
INSERT 시 처리속도를 높일 수 있다.
모든 행이 INSERT 된 후에 인덱스를 생성해주는 옵션이다.

--extend-insert, -e
INSERT 문을 생성 시 다중 INSERT 문으로 생성해주는 옵션이다.
동일한 열 지정이 제외되므로 그만큼 파일 사이즈가 줄어들고 복원 시
삽입속도를 좀 더 빠르게 할 수 있다.

--quick, -q
이 옵션은 테이블에 대한 열을 서버에서 한 번에 한 열씩 추출하여 메모리에 버퍼링 된 데이터를
덤프하므로 대용량 테이블을 덤프할 때 유용하다.

--routines, -R
스토어드 프로시저, 함수를 덤프한다. 덤프된 루틴이 재생성될 때 원래의 타임스태프 값을
가지게 하기 위해서는 mysql.proc 테이블의 내용물을 직접 덤프하여 사용한다.

--where='where_condition, -w 'where_condition'
주어진 where 조건문에 해당되는 데이터만 덤프한다. 조건 지정 시 인용부호를 사용한다.
ex) -where="userid='홍길동'"
     -w "depth >1"

2. 데이터베이스 복원
복원 명령어도 간단하다.
shell> mysql -u[username] -p [dbname] < 덤프파일명
예1) test 데이터베이스에 복원
shell> mysql -utest -p test < dump.sql
예2) 전체백업된 덤프파일 복원
shell> mysql -utest -p < fulldump.sql
예3) 덤프파일 경로지정, 데이터베이스 지정
shell> mysql -e "source /path/backup.sql" [dbname]

상황에 따라 옵션 지정이 달라지므로 메뉴얼이랑 친숙하게 지내는게 좋겠다.
Posted by 세모아
,


◘ MySQL 백업과 복구


▮ mysqldump


  mysqldump [옵션] db_name [table_name] > backup_filename

  mysqldump [옵션] --databases [옵션] db_name1, db_name2, .... > backup_filename

  mysqldump [옵션] --all-databases [옵션] > backup_filename


  [옵션]

     -A, --all-databases     : 모든 DB를 덤프

     --add-locks                : 덤프 전에 lock 덤프 후에 unlock

     --add-drop-table         : 덤프 이후에 출력물의 앞에 drop table 명령 추가 (복구 위해)

     -B, --databases          : 여러 DB를 동시에 덤프할 때 사용

     -f, --force                   : 에러를 무시

     -h, --host                   : 지정한 호스트의 데이터를 덤프

     -t                  : data만 덤프

     -d                 : 데이터를 제외하고 스키마만 덤프

     -p                 : 사용자의 암호를 지정

     -P                 : 포트번호 지정

     -u                 : 사용자명 지정


▮ Data만을 백업


  : LOAD DATA INFILE에서 사용한 파일의 경우 Data만 포함하는 것처럼 select 명령을 이용해서 Data만 포함된 형식으로 백업


   [문법]

       - SELECT column_name, output_type

        INTO OUTFILE '경로 및 파일명‘

        [FIELDS TERMINATED BY '종단문자‘]

        FROM table_name

        WHERE 조건구문 ;


ex) student table의 내용을 각 컬럼을 | 로 구분해서 성이 마씨인 학생만 ‘/root/student.dat'로 저장


 mysql> select *

       -> into outfile '/root/student.dat'

       -> fields terminated by '|'

       -> from student

       -> where sname like '마%';

 Query OK, 3 rows affected (0.00 sec)


 [root@linux /root]# cat student.dat

 012312|마량|남|3|물리|3.50

 013213|마초|남|2|화학|2.42

 013111|마대|남|1|생물|1.23


 ※ [= 외부 명령어]


    #  mysql -p -e "select * from school.student where sname like '마%';"


▮ 복구

  : 백업된 내용의 복구는 mysql 명령어나 mysqladmin 명령어를 사용함


  ex) root의 password가 12345인 상태에서 database1을 백업한 data.db라는 백업파일을 복구


   $ mysqladmin -u root -p12345 drop database1       // database1 삭제

   $ mysqladmin -u root -p12345 create database1   // database1 생성 

   $ mysql -u root -p12345 database1 < data.db        // data.db파일로 database1 복구

 ======================================================================================

백업파일을 생성할 위치로 이동한다.


MySQL 백업

mysqldump -u사용자명 -p패스워드 DB명 > 생성할 파일


예)

/usr/local/mysql/bin/mysqldump -uroot -p패스워드 system > backup.sql


가끔 한글이 깨져서 나올 때가 있다.

이럴 때는 character set 을 지정하여 백업파일을 만들면 된다.


예)

/usr/local/mysql/bin/mysqldump -uroot -p패스워드 system --default-character-set latin1 > backup.sql;


그럼 DB의 character set 은 어떻게 알까?


MySQL에 접속하신 다음 status 치면 된다.


...

Server characterset:    latin1
Db     characterset:    latin1
Client characterset:    latin1
Conn.  characterset:    latin1
...


복구할때는


예)

mysqladmin -u root -p패스워드 create database명

mysql -u root -p패스워드 database명 < backup.sql


database 명을 지정하지 않고 전체를 다할 경우,,


-- 전체 백업
/usr/local/mysql/bin/mysqldump -u아이디 -p패스워드 --all-database > backup.sql


-- 전체 복원
/usr/local/mysql/bin/mysql -u아이디 -p패스워드 < backup.sql

 ==================================================================================

MySQL DUMP 백업 및 복원


백업/복구 모두 cmd모드에서 할것.


====백업====


1.cmd접속

-권한이 있는 계정으로 dump할것 .(보통 root계정)


2.명령어

-p[비밀번호]는 한칸 띄우지 말고 붙여서 할것.


3.저장위치를 파일명 앞에 적지않으면 현재 위치해 있는 폴더에 백업한다.


====복구====


1. Mysql 5.0 계정생성, 디비생성 참조.

-계정 및 계정에 권한을 주고 db까지 셋팅.


2.cmd접속

-권한이 있는 계정으로 dump할것 .(보통 root계정)


2.명령어(밑에)

-u[아이디] -p[비밀번호]는 한칸 띄우지 말고 붙여서 할것.


명령어


== 백업 ==


DB전체 덤프
mysqldump -u[아이디] -p[비밀번호] --all-databases > [저장될 파일명]


DB만 덤프
mysqldump -u[아이디] -p[비밀번호] [디비명] > [저장될 파일명]


테이블 구조만
mysqldump -u[아이디] -p[비밀번호] --no-data [디비명] [테이블명] > [저장될 파일명]


테이블구조를 제외한 데이터만 덤프
mysqldump -u[아이디] -p[비밀번호] --no-create [디비명] [테이블명] > [저장될 파일명]


==복구 ==


덤프파일을 이용한 복구
mysql -u[아이디] -p[암호][디비명] < [파일명]


패스워드 동시 입력시 복구 안되면
mysql -u[아이디] -p[공백][디비명] < [파일명]


Posted by 세모아
,
from: http://www.samlogic.net/articles/manifest.htm
 

What is a Manifest (in Windows)?


A manifest is a XML file that contains settings that informs Windows how to handle a program when it is started. The manifest can be embedded inside the program file (as a resource) or it can be located in a separate external XML file. If the manifest is placed in a separate file, then the file must be located in the same folder as the executable file and it must have same filename as the program file, but with a ".manifest" filename extension added at the end (e.g "MYAPP.EXE.manifest").
 
Manifests can also be used with library files (such as DLL files), but in this article we will focus on manifests that are used with program files (EXE files). Manifests that are used with programs are often referred to as application manifests and manifests that are used with DLL files and other library files are often referred to as assembly manifests.


XML is used
 
The settings in a manifest are always specified by using the XML language (XML is a shortening for Extensible Markup Language). One common setting that often is included in a manifest is information to Windows Vista and Windows 7 if the application requires administrator privileges or if standard user privileges are enough. If the program requires administrator privileges a User Account Control (UAC) dialog box is shown when the program starts and the user must confirm that the application can be run with elevated privileges. If the application only need standard privileges the program is started without the UAC dialog box.


A manifest can be used to give a program a modern design
 
Manifests are also often used to inform Windows which version of a DLL a program is dependent of. By using manifests same DLL can exists in the computer in different versions and the program chooses which version of the DLL to load. This is sometimes referred to as the side-by-side technology in Windows. DLL's that exists in different versions in the computer are sometimes referred to as side-by-side assemblies.
 
One common use of manifests and the side-by-side technology is to inform Windows which version of the Windows common controls the program need to use. The Windows common controls are used to draw menus, dialog boxes, buttons, etc. in an application and two different styles can be used: a classic visual style and a modern visual style. The "modern visual style" is the modern 3D style that was introduced with Windows XP and that has evolved even more in Windows Vista or Windows 7, with shadows, light effects and metal effects etc. The "modern visual style" is also theme-aware so if the Windows user changes the Windows theme, also the application will be affected. If you want your application to use same visual style and also be Windows theme-aware you can specify it in your manifest. In one of the manifest examples below we will show how this can be done.
 
When more than one version of a DLL with the same filename exists in Windows, all additional (newer) versions are located in a folder with the name WinSxS in the Windows folder. The original (oldest) version of the DLL is normally located in Windows system folder.


Manifest file examples
 
Below we will show some examples of manifest files. The manifest examples assume that you are a little familiar with XML since before because XML is the language that is used to define a manifest.

The example below shows a manifest that informs Windows that the program can be run with standard user privileges in Windows Vista and Windows 7:
 
<?xml version="1.0" encoding="UTF-8" standalone="yes"?>
<assembly xmlns="urn:schemas-microsoft-com:asm.v1" manifestVersion="1.0">
<assemblyIdentity
    version="9.0.0.0"
    processorArchitecture="x86"
    name="VI.EXE"
    type="win32"
/>
<description>SamLogic VI Editor</description>
<trustInfo xmlns="urn:schemas-microsoft-com:asm.v3">
    <security>
        <requestedPrivileges>
            <requestedExecutionLevel level="asInvoker" uiAccess="false"/>
        </requestedPrivileges>
    </security>
</trustInfo>
</assembly>
 
If the program instead needs administrator privileges to be able to run, the XML script between the trustInfo tags should look like this:
 
<trustInfo xmlns="urn:schemas-microsoft-com:asm.v3">
    <security>
        <requestedPrivileges>
            <requestedExecutionLevel level="requireAdministrator" uiAccess="false"/>
        </requestedPrivileges>
    </security>
</trustInfo>
 
As you can see in the example, the "asInvoker" setting has been replaced with a "requireAdministrator" setting at the "requestedExecutionLevel level=" tag. These settings are ignored in Windows XP and only used by Windows Vista and Windows 7 (and by the latest server version of Windows from Microsoft: Windows Server 2008).

In the next example we will show you how you in a manifest can specify that a specific version of Windows common controls should be used. In this example the program wants to use Windows common controls version 6.0, which will give the program a modern visual look.
 
<?xml version="1.0" encoding="UTF-8" standalone="yes" ?>
<assembly xmlns="urn:schemas-microsoft-com:asm.v1" manifestVersion="1.0">
<assemblyIdentity
    version="9.0.0.0"
    processorArchitecture="x86"
    name="VIS32X.EXE"
    type="win32"
/>
<description>SamLogic Visual Installer (Main Installer)</description>
<dependency>
    <dependentAssembly>
        <assemblyIdentity
            type="win32"
            name="Microsoft.Windows.Common-Controls"
            version="6.0.0.0"
            processorArchitecture="x86"
            publicKeyToken="6595b64144ccf1df"
            language="*"
        />
    </dependentAssembly>
</dependency>
<trustInfo xmlns="urn:schemas-microsoft-com:asm.v3">
    <security>
        <requestedPrivileges>
            <requestedExecutionLevel level="asInvoker" uiAccess="false"/>
        </requestedPrivileges>
    </security>
</trustInfo>
</assembly>
 
 
More information
 
If you want to read more information about manifests you can go to this page at Microsoft:
 
Manifest Files Reference
 
If you want to read more about XML you should read this page about XML at Wikipedia.

 
This article refers to:
SamLogic Visual Installer 2010

Other articles
More articles are available from the article index page.


'Programming' 카테고리의 다른 글

[펌] 왜 이리 버그가 많아요?  (0) 2011.08.23
Manifests (from MSDN)  (0) 2011.04.26
Side by Side Configuration Incorrect의 해결책  (0) 2011.04.26
Posted by 세모아
,

Manifests (from MSDN)

Programming 2011. 4. 26. 14:10
from: http://msdn.microsoft.com/en-us/library/aa375365%28v=vs.85%29.aspx

Manifests

Manifests are XML files that accompany and describe side-by-side assemblies or isolated applications. Manifests uniquely identify the assembly through the assembly's assemblyIdentity element. They contain information used for binding and activation, such as COM classes, interfaces, and type libraries, that has traditionally been stored in the registry. Manifests also specify the files that make up the assembly and may include Windows classes if the assembly author wants them to be versioned. Side-by-side assemblies are not registered on the system, but are available to applications and other assemblies on the system that specify dependencies in manifest files.

Manifest files enable administrators and applications to manage side-by-side assembly versions after deployment. Every side-by-side assembly must have a manifest associated with it. The installation of Windows XP installs the supported Microsoft side-by-side assemblies with their manifests. If you develop your own side-by-side assemblies, you must also install manifest files. For more information, see Installing Side-by-Side Assemblies and Manifest Files Reference.

Manifests and configuration files are not localized.

The following types of manifests are used with side-by-side assemblies:

  • Assembly manifests describe side-by-side assemblies. They are used to manage the names, versions, resources, and dependent assemblies of side-by-side assemblies. The manifests of shared assemblies are stored in the WinSxS folder of the system. Private assembly manifests are stored either as a resource in the DLL or in the application folder
  • Application manifests describe isolated applications. They are used to manage the names and versions of shared side-by-side assemblies that the application should bind to at run time. Application manifests are copied into the same folder as the application executable file or included as a resource in the application's executable file.
  • Application Configuration Files, are manifests used to override and redirect the versions of dependent assemblies used by side-by-side assemblies and applications.
  • Publisher Configuration Files, are manifests used to redirect the version of a side-by-side assembly to another compatible version. The version that the assembly is being redirected to should have the same major.minor values as the original version.


Send comments about this topic to Microsoft

Build date: 8/19/2010


'Programming' 카테고리의 다른 글

[펌] What is a Manifest (in Windows)?  (1) 2011.04.26
Side by Side Configuration Incorrect의 해결책  (0) 2011.04.26
[펌] SetThreadAffinityMask  (0) 2010.09.13
Posted by 세모아
,
출처: http://www.codeproject.com/KB/winsdk/sidebysideerror.aspx

Side by Side Configuration Incorrect

By Member 3490500 | 11 Nov 2009
Application has failed to start because side by side configuration is incorrect

Getting Started

Most of the developers using assemblies in their application may have faced this issue. While starting an application, we may get an error “This application has failed to start because its side by side configuration is incorrect”.

Introduction

Side by side configuration is a trick for versioning files, in which multiple versions of a file are installed in a single machine. This is achieved through manifest files. E.g.: the C Runtime Library assembly contains three DLLs—msvcr80.dll, msvcm80.dll and msvcp80.dll — and is used by applications when they are built using functions from the CRT library. Side-by-side technology is also known as WinSxS or SxS.

What is Side by Side Configuration?

A side-by-side assembly contains a collection of resources—a group of DLLs, Windows classes, COM servers, type libraries, or interfaces—that are always provided to applications together. These are described in the assembly manifest.

Why is it Important?

In many cases, it is possible to update existing applications to use side-by-side assemblies without having to change the application code. Developers are encouraged to use side-by-side assemblies to create isolated applications, and to update existing applications into isolated applications for the following reasons:

  • Side-by-side assemblies reduce the possibility of DLL version conflicts.
  • Side-by-side assembly sharing enables multiple versions of COM or Windows assemblies to run at the same time.
  • Applications and administrators can update assembly configuration on either a global or per-application configuration basis after deployment. For example, an application can be updated to use a side-by-side assembly that includes an update without having to reinstall the application.

How is it Working?

In the preceding example shown in above picture, both Comctl32.DLL version 6.0 and Comctl32.DLL version 5.0 are in the side-by-side assembly cache and available to applications. When an application calls to load the DLL, the side-by-side manager determines whether the application has a version dependence described in a manifest. If there is no relevant manifest, the system loads the default version of the assembly. For Windows XP, version 5.0 of Comctl32.DLL is the system default. If the side-by-side manager finds a dependence on version 6.0 stated in a manifest, that version is loaded to run with the application.

Is it Related Project Settings?

We have to check if it is possible to resolve with project settings because EXE will run in debug build and fails to start in release build. Change your project settings to not use the runtime library, but this will make the output EXE bigger. (Project Properties -> C/C++ -> Code Generation -> Runtime Library -> use/MT or /MTd depends on your current configuration.) This may work, but it is not the solution for this issue.

Is it OS Related?

No, it is not an OS related issue. Since most of the experiences for this issue are in Vista, initially I thought it is only in Vista machine. Side by side error will come irrespective of OS, if reference assembly is missing from Sxs folder.

What is the Solution?

Now we need to think about the solution for this. Since the error message itself is saying “Please check windows event viewer for further information”. Go to event viewer and check for entry with sidebyside. Here we will take an example:

"Activation context generation failed for “DataViewer.dll". Dependent Assembly Microsoft.VC90.MFC, processorArchitecture="x86", publicKeyToken="1fc8b3b9a1e18e3b", type="win32", version="9.0.21022.8" could not be found. Please use sxstrace.exe for detailed diagnosis."

Here we are clear with what we are missing. We are missing 9.0.21022.8 version of Microsoft.VC90.MFC. You can go to C:\Windows\WinSxs folder and manually verify this dependent assembly is there or not. Since we are missing an assembly, the only solution is that reference assembly should be in the machine we are running our application on. Since we need to install dependent assembly to our client machine, we need to run Microsoft redistributable package for the required assembly to client machine. See section website for patches for downloading packages.

Are Sxstrace.exe Tools Useful?

This tool helps us for detailed diagnosis such as assembly probing steps. It also help us to identify what all are the previous versions available and loaded by the application and which folder it is currently searching for.

How Can I Use sxstrace.exe?

For running sxstrace.exe, go to Visual Studio command prompt and type sxstrace.exe. Usage is as follows:

  1. Before running your application, run sxstrace in trace mode sxstrace.exe Trace -logfile:C:\tmp\MySxSTrace.log
  2. Reproduce the error by starting your application
  3. Now stop the trace by using the below command sxstrace.exe Parse -logfile:C:\tmp\MySxSTrace.log -outfile:C:\tmp\MySxSTrace.txt
  4. Open output file from C:\tmp\MySxSTrace.txt

Website for Patches

Conclusion

Side by side configuration error comes because of the referenced assembly missing from winsxs folder. There is no code change for this issue, we can install the required patches to client machine and rebooting the PC will resolve this issue.

History

  • 11th November, 2009: Initial post

License

This article, along with any associated source code and files, is licensed under The Code Project Open License (CPOL)


'Programming' 카테고리의 다른 글

[펌] What is a Manifest (in Windows)?  (1) 2011.04.26
Manifests (from MSDN)  (0) 2011.04.26
[펌] SetThreadAffinityMask  (0) 2010.09.13
Posted by 세모아
,

from: http://1stpasa.tistory.com/8

SetThreadAffinityMask

Thread Handle을 인수로 받아 특정 코어에서 해당 Thread를 실행하도록 지정해주는 함수.

0x01 부터 순서대로 한비트씩 쉬프트 하면 원하는 코어를 결정할수 있다.

주의할점은 하나의 Thread는 여러개의 코어가 모두 실행시킬수 있는데

만약 첫번째 코어와 두번째 코어가 모두 실행 가능하도록 설정하고 싶다면

01 과 10 의 OR 연산결과값인 0x03 을 설정하면 되는것이다.

만약 코어 1,2,3 에서 실행가능하게 하고 싶다면

001 , 010  그리고 100 를 OR 연산하여 호출해주면 된다.


아래의 코드는

SetThreadAffinityMask 를 테스트해보는 예제인데

주석처리된 부분을 그대로 두고 실행하면 재미있는 결과를 얻을수 있다.

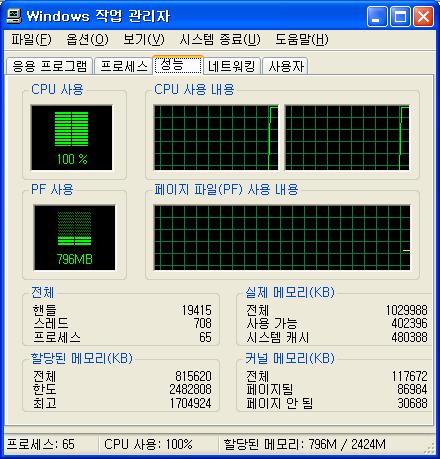
실행하면 Core의 수를 출력한뒤 코어의 갯수에 해당하는 Thread를 생성하고

무한루프를 돌려서 CPU 점유율을 100%로 만들어 버린다.

그리고 콘솔창에서 숫자키 1~9까지의 숫자를 사용해 원하는 번호의 Thread를 정상종료

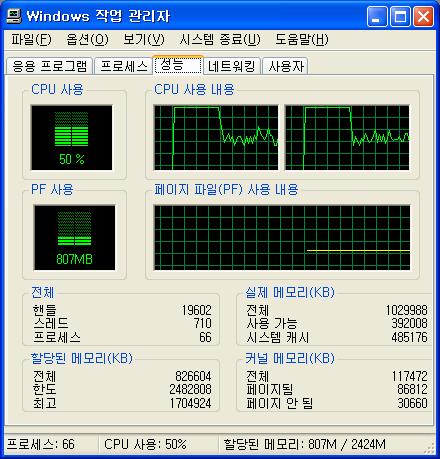
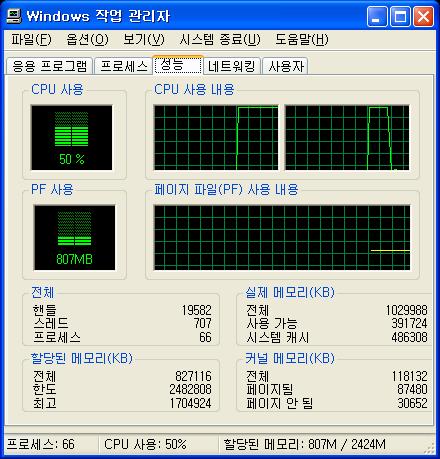
시킬수 있는데. 만약 듀얼코어에서 쓰레드 하나만 죽인다면 50%의 점유율을 차지하게 될것은

당연한 이치이지만. SetThreadAffinityMask 를 사용하지 않았을 경우와 사용했을 경우의

점유율 그래프를 본다면 이마를 탁 치게 될것이다. ( 벌써 알고 계셨다면.. 굳ㅋ )

  1. #include <iostream>  
  2. #include <conio.h>  
  3. #include <windows.h>   
  4.   
  5.   
  6.   
  7. using namespace std;   
  8.   
  9.   
  10. DWORD WINAPI ThreadProc(LPVOID arg)  
  11. {  
  12.  while( *((bool*)(arg))  )Sleep(0);   
  13.   
  14.   
  15.  return 0;  
  16. }   
  17.   
  18.   
  19. int main(int argc, char argv[])  
  20. {  
  21.  SYSTEM_INFO info;  
  22.  GetSystemInfo(&info);   
  23.   
  24.   
  25.  cout << info.dwNumberOfProcessors << endl;   
  26.   
  27.   
  28.  bool *flag = new bool[ info.dwNumberOfProcessors ];   
  29.   
  30.   
  31.  HANDLE *hTrhead = new HANDLE[info.dwNumberOfProcessors];   
  32.   
  33.   
  34.  for(int i = 0 ; i < info.dwNumberOfProcessors ; i++ )  
  35.  {  
  36.   flag[i] = true;  
  37.   hTrhead[i] = CreateThread(0,0,ThreadProc,&flag[i],0,0);  
  38.   //SetThreadAffinityMask( hTrhead[i]  , 1 << i );  
  39.  }   
  40.   
  41.   
  42.   
  43.  char c;  
  44.  while(1)  
  45.  {  
  46.   c = getch();   
  47.   
  48.   
  49.   if( c >= '1' && c <= '9' )  
  50.    flag[ c-'1' ] = false;   
  51.   
  52.   
  53.   if( c == 13 )  
  54.    break;  
  55.  }   
  56.   
  57.   
  58.  return 0;  
  59. }  

사용자 삽입 이미지
사용자 삽입 이미지
사용자 삽입 이미지

가운데 있는 사진이 SetThreadAffinityMask 를 사용하지 않아서

코어가 쓰레드의 삽질을 같이 보듬어주고 있는경우고

아래의 사진은 SetThreadAffinityMask를 통해 하나의 코어가 하나의 쓰레드만 담당하여

2번째 쓰레드를 죽이고나니 개미와 베짱이를 연출시킨 상황이다.


'Programming' 카테고리의 다른 글

[펌] What is a Manifest (in Windows)?  (1) 2011.04.26
Manifests (from MSDN)  (0) 2011.04.26
Side by Side Configuration Incorrect의 해결책  (0) 2011.04.26
Posted by 세모아
,
출처: http://arcangeleri.blog.me/90089351278

VC++ 2008 셋팅 & Google Test

말할 것도 없습니다. Google은 C++은 전부 Google Test로 유닛 테스트를 한다고 합니다.

왜 더 Unit++ 같은 테스트 도구가 이미 있는데 Google Test를 쓸까요. 좋기 때문입니다.

제가 봤더니 확실히 좋은 기능도 많고 편합니다.

자 뭐 금강산도 식후경 일단 맛을 봐야 구글 테스트의 쫄깃함을 아실 수 있으실 겁니다.

자 일단 구글 테스트를 받아야 겠습니다.

http://code.google.com/p/googletest/downloads/list


전 VC++을 씁니다. 당연합니다. 전 MS빠 입니다.

다른 도구를 쓸 리가 없습니다. 그럼 바로 셋팅 들어갑니다.

압축을 푸시면

대략 이러합니다. MSVC 눈에 띄는 군요. 잽싸게 들어갑니다.

이걸 실행하면 멋지게 실행 됩니다.

2005든 2008이든 변환 마법사가 뜹니다. 별다른 셋팅 없이 그냥 Finish나 마침을 눌러서 변환 합니다.

앗차!

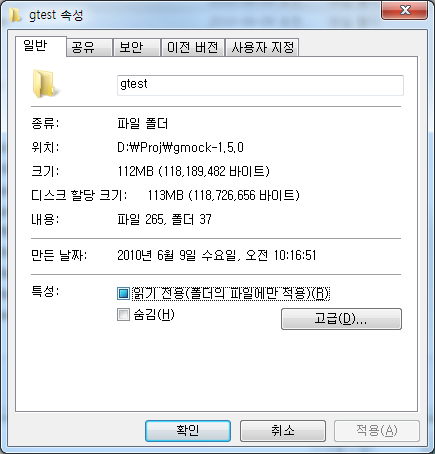
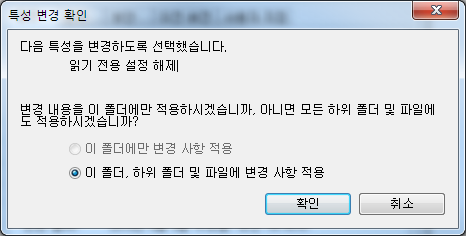
그 전에 압축을 푸시면 gtest 디렉토리가 읽기 전용입니다.

그래서 변환을 할 수 없다고 VS가 푸념을 늘어놓을 겁니다.

아래대로 셋팅합니다.

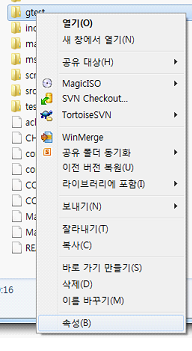
gTest 최상위 루트로 갑니다. gTest를 오른쪽 클릭합니다.

메뉴에서 맨 밑에 있는 속성을 클릭합니다.


이제 소스 코드가 있으니까 원하시는 입맛대로 소스를 라이브러리로 만드셔도 되고 소스 통째로 사용하셔도 됩니다.

만약 기존 유닛테스트를 하고 싶으신 프로젝트에 MFC를 사용하고 계시다면 컴파일 옵션에 /MT /Mtd / MDd /Md 옵션을 일치시켜주셔야 합니다. 안그러면 스텐다드 라이브러리는 사용하는 경우 already defined Linker error를 몸소 체험하시게 될 것입니다.


자 인제 예제를 해봅시다.


MFC라면 InitInstance나 win32 console이시라면 _tmain이 되겠습니다.

#include <gtest/gtest.h> 


void InitInstance() or

int main(int argc, char **argv)

{

      ::testing::InitGoogleTest(&argc, argv); 

    return RUN_ALL_TESTS(); 

}


Test(SampleTest, Test1)

{

    ASSERT_TRUE(true);

    EXPECT_TRUE(true);

}


아놔 여기까지 하신거면 절반은 하신겁니다.

아니 거의 다하신 겁니다.


내일부터 실전 들어갑니다.

정말 게임 코드를 가지고 해보도록 하겠습니다.


그리고 앞서 나가실 분은 다음 페이지를 참조하시면 편할 것 같습니다.

http://code.google.com/p/googletest/wiki/GoogleTestPrimer

영어라면 손발이 오글오글 하시다면 하루에 한번씩 제 블로그에 놀러오시면 됩니다.


그럼 +_+/ 


'Programming > Test' 카테고리의 다른 글

[펌] Google Test & Visual Studio 2008  (0) 2010.09.10
Posted by 세모아
,
출처: http://wafe.kr/81

Google Test & Visual Studio 2008
  1. google test를 다운받는다.(gtest-1.3.0)
  2. 필요한 폴더만 남기고 나머지는 지운다. 실제 프로젝트에서 쓸 때에는 include, msvc, src 폴더 외에는 필요없다.
  3. msvc 폴더의 파일 중에도, 프로젝트에서 쓸 때에는 gtest.vcproj 파일 외에는 다 필요 없으므로 지워버린다.
  4. VS2008로 gtest.vcproj 파일을 열어서 2008 포맷으로 변환해준 후 VS를 닫는다. (닫을 때 sln을 저장할 것인지 물어보는데 저장하지 않음을 선택한다.)
  5. 프로젝트를 만든다.
  6. 솔루션 폴더에 gtest-1.3.0 폴더를 통채로 옮긴다.
    1. 여러 사람이 같이 작업하는 프로젝트에서 구글 테스트 프레임워크를 쓰기에는, 솔루션 폴더에 통채로 포함시키는 편이 공유하기에 편하다.
    2. 현재 사용중인 버전을 아는 것이 좋으니까 gtest-1.3.0 같은 식으로 폴더 이름에 프레임워크 버전을 포함시켜 두도록 한다.
  7. 솔루션에 "기존 프로젝트 추가"를 해서 gtest.vcproj 를 추가한다.
  8. 솔루션에 테스트 프로젝트를 추가한다.
    1. VC++ > 일반 > 빈 프로젝트를 추가하도록 한다.
  9. 테스트 프로젝트의 참조에 gtest 프로젝트를 추가한다.
  10. gtest-1.3.0/src 폴더에 있는 gtest_main.cc 테스트 프로젝트 폴더로 복사하고, 테스트 프로젝트에 추가한다.
  11. 테스트 프로젝트의 "추가 포함 디렉터리"에 $(SolutionDir)\gtest-1.3.0\include 를 추가한다.
  12. 테스트 프로젝트와 gtest 프로젝의 구성 속성에서 "C/C++ > 코드 생성" 페이지의 "런타임 라이브러리"를 맞춰준다. (여기서는 다중 스레드 디버그(/MTd)로 맞췄다.)
  13. 테스트 프로젝트의 구성 속성에서 "빌드 이벤트 > 빌드 후 이벤트" 페이지의 "명령줄"에 $(TargetPath) 를 설정해준다. 이렇게 하면 프로젝트가 빌드 된 후 바로 테스트 프로젝트가 실행되고, 실행 결과가 VS 출력 창에 나타난다. gtest-output.png
  14. 실패하는 테스트 케이스가 있는 경우에는 컴파일 에러와 마찬가지로 출력 창에 소스 파일과 라인이 표시되기 때문에 마우스로 더블클릭하면 실패한 라인으로 바로 이동된다.


참조:


'Programming > Test' 카테고리의 다른 글

[펌] VC++ 2008 셋팅 & Google Test  (0) 2010.09.10
Posted by 세모아
,
http://cafe.naver.com/whatvoip.cafe?iframe_url=/ArticleRead.nhn%3Farticleid=194


차례


1. 서문

2. Windows XP 에서 IIS 설치

3. WIndow Xp IIS SetUp

4.Windows XP  IIS 운영


서문


웹 서버는 보통 서버급 컴퓨터에서 서비스 가능 한데 요즘은 PC의 고성능으로 Windows XP 에서도 운용 가능하다. DB 는 MsSql, Oracle 등이 있는데  MsSql 은 서버급에만 설치가 가능하고 Oracle 은 PC 에도 설치 가능 하다.  DNS 서버만 Windows XP 에서 제공하면 완벽한 Web 서버를 구축 하는데 제공 하질 않는다. 필요 하면 만들어 쓰는 수밖에 없는것 같다.


개인적으로 PC 에서 보려면  http://localhost 로 가능 하지만 외부에서 보려면  http://xxx.xxx.xxx.xxx 와 같이 PC IP 를 적어 주면 접속이 가능하다. IP 가 외우기 어려워 URL 같은 도메인을 사용 하는데 일반 PC 의 IP가 유동이라 안되는것은 아닌데 약간 어려운 점이 있다 .


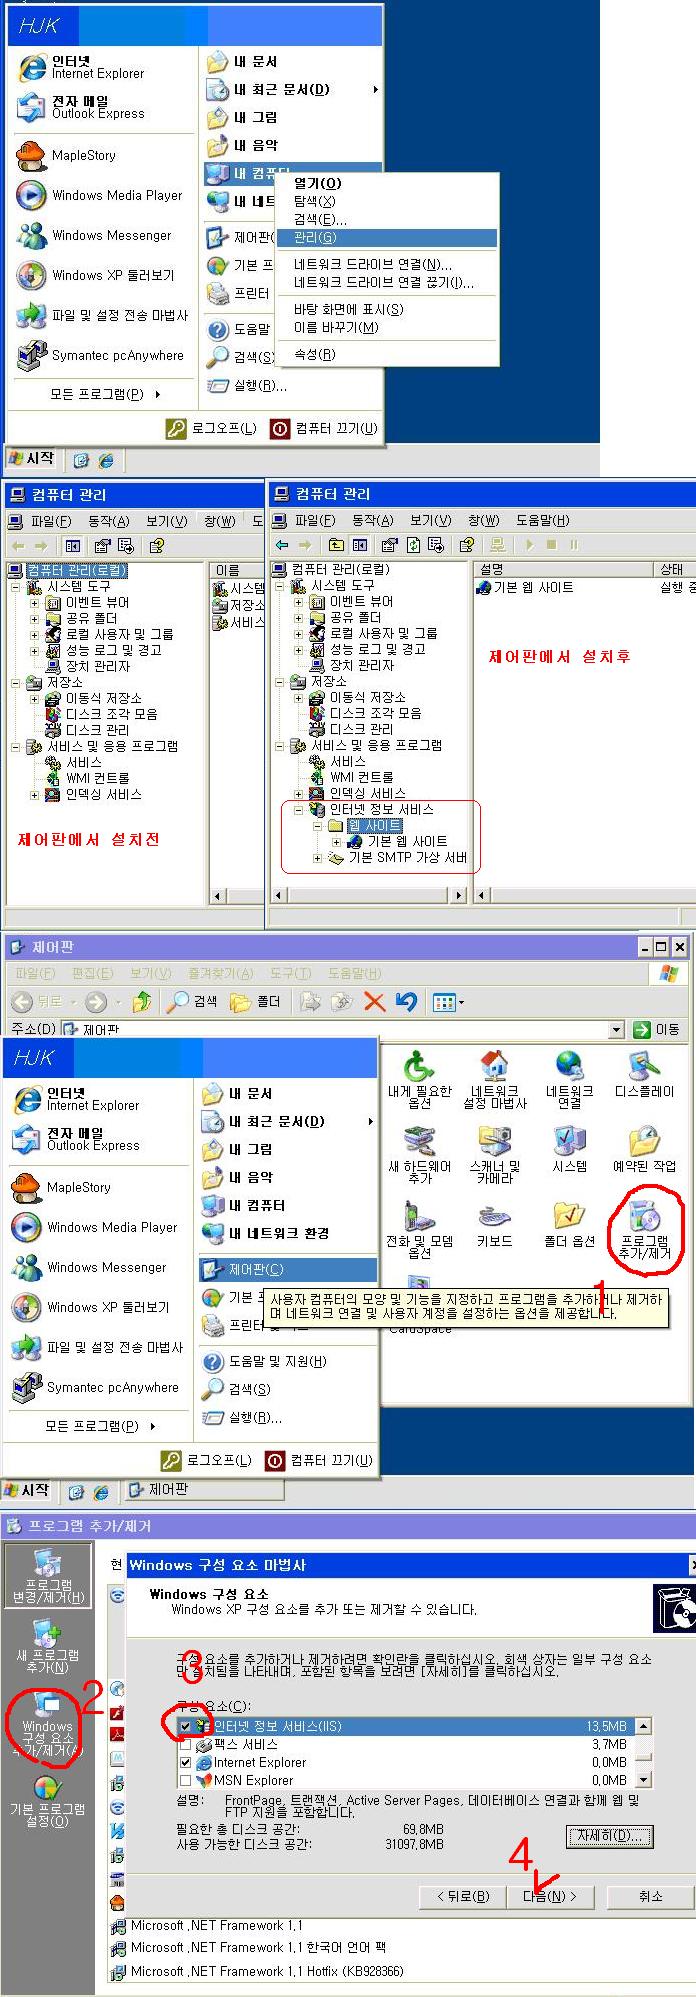
Windows XP 에서 IIS 설치


Windows XP 는 기본적으로 IIS 가 설치 되어 있지 않다. 확인후 아래와 같이 설치 한다

설치시에는 당연히 Windows XP CD 가 있어야 한다


WIndow Xp IIS SetUp


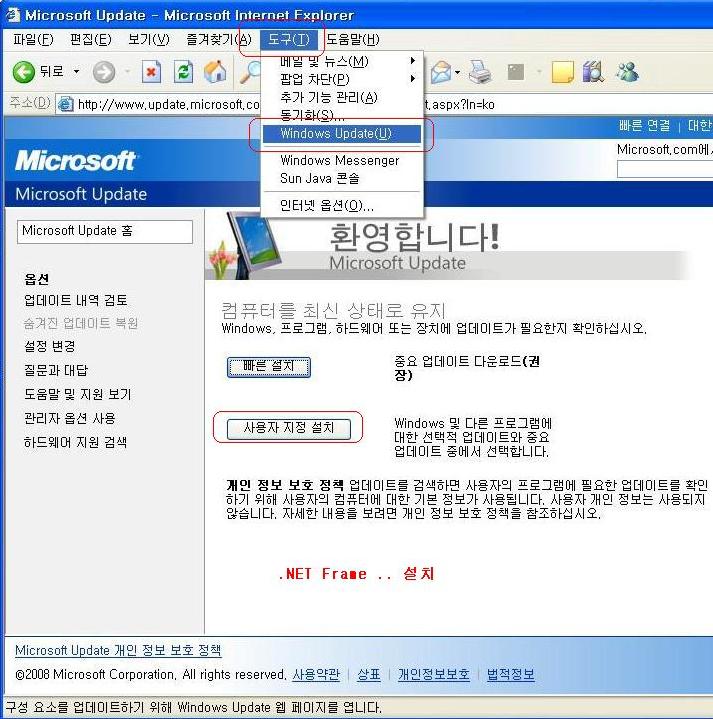
ASP.NET  옵션이 나오지 않으면 아래 그림과 같이 [ 익스플로워]  [도구] -> [Windows Update] -> [사용자 지정 설치] 에서 .NET FRANE 를 설치 한다.


Windows XP  IIS 운영


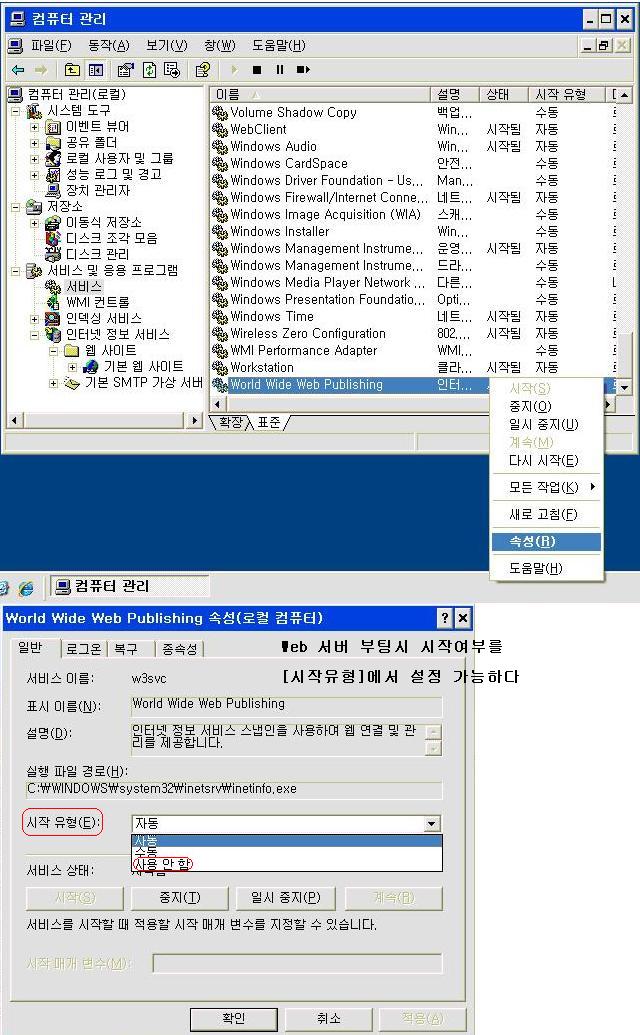
시작과 중지가 가능 하다.  부팅시 시작 여부를 설정 할수도 있고, 운용 하지 않게 설정도 된다


함 서비스 해보자.     Oh My First Web Service !!!


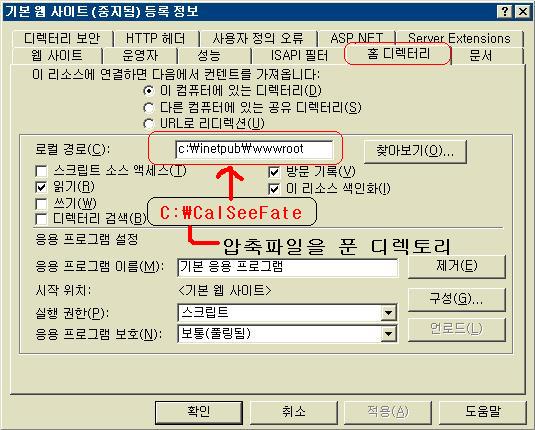
첨부된 파일을 풀고(C:\CalSeefFate 디렉토리에 풀었다고 보고)  아래와 같이 설정한다


http://localhost   <- 요거 클릭 하면 자기 PC 에 설치 된것 나오고


http://Cal.SeeFate.com   <- 요거 클릭 하면 다른 서버의 화면이 나온다


Posted by 세모아
,